Tuesday, 15 May 2012

Tuesday Alchemy Wedding Challenge

So this weeks challenge over at the Tuesday AlchemyTuesday Alchemy blog is Happy Wedding! I've been really busy the past couple of weeks getting ready for a couple of local Craft Fairs but after a bit of a wobbly time with my whiplash I really wanted to get back in to the swing of things and create something for this challenge.
So here is what I made,a decoupaged wedding spoon.
I thought it might be something a little different and I really like wedding spoons,I was given one at my wedding and they are a nice keepsake of the day.

I gave the spoon a couple of coats of gesso,sanding after each one and then decoupaged it,using matte gel medium, with flowers cut from an old book.  I glued one end of a piece of satin ribbon to the back of the spoon,twisted it round the handle and glued the other end to the top of the handle.  Finally I added a hanging loop (the spoon has a little hook screwed in to the end of the handle) and a bow.

The tradition of giving a wooden spoon dates back many many years, the wooden spoon was considered to be the most useful utensil to be used by the woman of the house in her kitchen and would be used to help and assist the new Bride in her kitchen to enable her to cook and produce the best meals for her new husband, and later her family. An interesting Scottish variation on this custom was the giving of a spirtle (for stirring the porridge) in lieu of a spoon.

Willingham Craft Fair


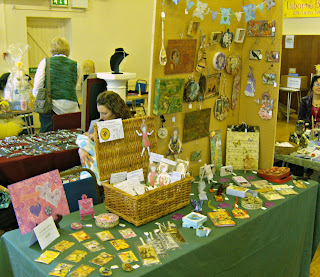
I thought I would share a couple of photos of my stall from the recent Craft Fair I attended in Willingham.  It was a fabulous day,saw some familiar faces and met some lovely new ladies too.  One of the best things about Craft Fairs is getting to meet fellow crafters,seeing what they create and having a natter.  It's a great way of discovering places I would never normally visit too,Willingham is a beautiful place, but I must say the road to get there was adventurous to say the least,thank goodness for shock absorbers and my SatNav!
Thanks for dropping by and I do hope you'll join us over at Tuesday Alchemy for this week's challenge xx

Thursday, 26 April 2012

Black and White (with a bit of a fright!)

So folks,for this week's DT challenge - 'Black and White',over at Tuesday Alchemy, I decided to make a skull brooch.  I'd recently treated myself to a bargain bag of woodcuts from the wonderful porkchopshow on Etsy  http://www.etsy.com/shop/porkchopshow?ref=seller_info
Here's the little collection I purchased (lucky me!) and below is the brooch I made using the fab black and white skull that was included.
I've made a few of these brooches recently,I'd found a few brooch backs and decided some vintage sheet music rosettes would look groovy as a base.  I'm hoping to get some listed in my Etsy shop very soon.
Things are getting very exciting over at Tuesday Alchemy now,this week's challenge has a fabulous sponsor - http://www.karensscrapsandgraphics.com/store/   They are offering a $10 coupon to the winner of this week's challenge to use at their shop and you still have plenty of time to join in!

Tuesday Alchemy

Exciting DT Happenings!

Hello hello,it's been a while! Exciting things are happening over at the Tuesday Alchemy blog!
Corrinne has been working really hard to get the blog off the ground and this week's challenge has a great sponsor!  Check it out.
 Tuesday Alchemy: Challenge #11: Black & White - PRIZE: We are very excited to have a sponsor this week! Karen's Scraps And Graphics is offering a $10 coupon to the winner of this week's challen...

Here's what I've come up with for some previous challenges -

Collaged tag for 'Anything Goes'
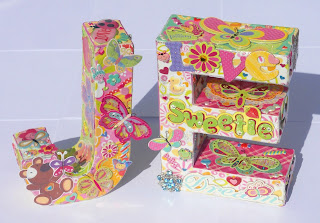
Blinged up papier mache letters I created for my daughter's room for the 'Sparkle and Shine' challenge.

'' Polka Dots' The cute little girl I used to create this paper doll is an image from the wonderful JoAnne of takeabreak who shares some wonderful public domain images on flickr http://www.flickr.com/photos/takeabreakwithme/

Another little paper doll, this time I had fun going crazy with bows for the 'Overload'challenge!  Loved doing this!
Eileen joined us for the 'Spring Sweetness'challenge, she used her fabulous paper quilling skills to create this beautiful card.

Here's what I came up with for 'Spring Sweetness'- an altered upcycled matchbox.  Hidden inside is a little heart garland <3

So there's my catch up,boy was there some catching up to do,Corrinne's going to be chasing me with a frying pan!  ;o)  I've been busy with a couple of craft fairs recently so now I've got lots of catching up and organising to get done.  I think that calls for lots of coffee and anything involving chocolate!

Hope you've enjoyed seeing my recent makes,thank you so much for visiting xxx


Wednesday, 14 March 2012

Tuesday Alchemy catch up!

I can't believe we're on challenge number 5 over at the Tuesday Alchemy blog, I've got some catching up to do.  http://tuesdayalchemy.blogspot.com/2012/03/challenge-5-mermaids.html

Last week's challenge was feathers,which had me a bit stumped for a while and then I suddenly knew exactly what I wanted to do,hooray!

I thought that I had some Native American Indian images on a disc I had,but after a very long time of looking through several discs for them I realised my brain had just made that up!  I decided to buy a download of suitable images from Etsy because my mind was set,so off I went to Etsy and found this!
What a great find,loads of lovely images and really great quality and they sent it to me within minutes of me ordering it, pretty good service,I'd say.
I wanted to use the feathers like a specimen plant (ooh bit of a flashback there to my Floristry college days!) and pulled the idea together with some illustrations from an old book on Native American Indians,a small rusty heart and a tiny cream shell.
I used the turquoise for it's association with Native Americans and it was perfect for a pop of colour too.  I finished  with a bit of stamping with my trusty swirl stamp.  I use that stamp so much,I think if something happened to it I just might have a mild panic attack!

Ok , now on to this week's challenge, chosen by me!  Haha!
It just had to be mermaids didn't it? I love them!
Decided to use a clipboard as a base,because it's a good size for collage.
I love the fish in this,they're from an old nature book.
The shells are ones I collected myself from Brancaster Bay and the little flower is from a broken piece of jewellery.

I think I could make Mermaid things every day and never get bored.  I loved seeing what the other girls created for this challenge,a fab necklace,a groovy party favour bag and a scrumptious card.
There's still time to check out the blog and join in creating something mermaidy.

Tuesday, 28 February 2012

Partial to the Purple

Well the new challenge is out for Tuesday Alchemy - Tuesday Alchemy: Challenge #3 - Color Inspiration: Peacock & Plums: This week's challenge is all about color! Purple & teal are such beautiful colors that you will enjoy using them in your works.

I've got to say I absolutely love what everyone made this week,it must be those fab colours,you know I love that purple!
Here's my contribution.
I didn't really use much teal,there is a tiny bit on the butterfly and a teal butterfly collaged under the hearts(which are kind of a teal colour) but as would be expected I got carried away by(with) the purple :o)
I decided to use a mini canvas, painted and stamped it with acrylic paints and collaged with vintage sheet music and scrapbook papers.  I added a little button and a woodcut butterfly that I purchased from this awesome Etsy shop http://www.etsy.com/shop/porkchopshow  He has the most scrumptious butterfly wood cuts, you've got to check out his shop!
I will be adding this mini canvas to my Folksy shop tonight

I would love to see what other people come up with using this colour combo.  Visit the blog and link your fab creations so we can all see them.
If you're on Etsy why not join the Tuesday Alchemy group -
   I want lots more people to join so I can make a Treasury featuring all the members!

Tuesday, 21 February 2012

Birdsong

Well, being on a design team is certainly good for making me keep up to date with my blog,which I'm pretty pleased about  :o)  See, I'm getting this week's post written, but only because I'm getting a nudge, a week goes by soooo quickly!

Anyway, on to this weeks offering for the Tuesday Alchemy blog challenge.

Tuesday Alchemy

For this week's challenge we got to use anything from nature in our creation.
Straight away  I knew I wanted to make some sort of nest with a bird image.  I absolutely love birds and get so much joy from hearing birdsong in the garden.  I just can't imagine life without birds,I love them!  We don't get many birds in our garden and I don't try and encourage them for fear of our cat eating them.  He may seem too fat and lazy to bother chasing them,but I know  just how sneaky cats can be!
Bear on the prowl!


I used an upcycled bamboo chocolate box lid to give the piece some depth,I was going for a kind of nest/looking through a tree kind of look,worked out pretty good I think.  Painted the base with acrylic paints and then stamped some swirls on it before collaging the bird image onto it.  I enhanced the bird by adding some watercolour and acrylic paint to him. The twigs were broken up from a small wreath I had and then glued  around the edge of the lid.  I added skeleton leaves,a dried rose leaf and petal, some Spanish moss and a feather.  Some small rusty hearts were also tucked in between the twigs to tie in with the heart I used on the base (This was gifted to me by a good friend yonks ago with some other arty supplies,I knew I would find just the right project for it).

My Daughter helped me with the photos as the wind kept trying to whisk it away!

If you fancy having a go at making something with a 'Nature' theme drop by the blog and join in.  You can get inspired with a new idea every Tuesday and share your fab creations on the blog.


Wednesday, 15 February 2012

Bring on the Ruffles!(Bringing a Paper Art Doll to life)

Ooooh where do I start? I'm so excited!

I'm now a design team member for a fabulous new craft blog called Tuesday Alchemy. It's a great new blog that aims to inspire creativity as well as promote handmade artists and crafters and I'm super excited to be a part of the team.

I hope lots of you will join in

Tuesday Alchemy

The first challenge we were set was Ruffles. Well,it just so happens that I've been thinking about making a Paper Art doll with a ruffly skirt for quite some time and thought this was the perfect opportunity. Probably a rather obvious thing to make,a ruffled skirt! but she asked to be made and I couldn't say no.

I thought I would share a little of the process of creating her for anyone that is interested. I always like to see how other people's projects start out and then what they finish up with.

Isadora

 I had a look through my vintage image CDs and this lady jumped out at me. This particular image is from an 'Enchanted Mercantile' CD .  The creator of which, Petra Wilkinson,sadly passed away a few years ago and the company no longer exists.
I printed two copies out so that I could get a neater look when joining the arms together with the body.

Isadora as she appears originally.


  1. After gluing the picture to cardstock and letting it dry I then cut out the different body parts which I wanted to articulate and pieced them together to make sure they matched up nicely.


2. Next I folded a piece of vintage sheet music ( I love love love using vintage sheet music!) and then cut it to the shape and size I wanted and glued it to the skirt part of the doll.
3. Ruffled vintage lace glued on top of the folded paper layer.

4. Next layer of vintage sheet music stamped and folded ready to cut to size.

5.Stamped and folded sheet music then glued on top of lace layer.

6.  Lastly for the skirt I added a little ruffle of lace on each side of the skirt and then finished it with a final layer of simply folded sheet music.

7. Painted the body parts with shimmery watercolour paints to give her more depth.

8. Added some texture by 'lacing' her corset with embroidery thread.


9. Finally I attached brads to all the body parts and fixed her all together.

10.  I added a piece of vintage sheet music to give a nice finished appearance to her back and glued a small wire hanger to her back as well.


I'm not the greatest at explaining things, but hopefully you've enjoyed seeing how Isadora came to life.  She is now for sale in my Etsy shop - http://www.etsy.com/listing/93045003/paper-art-dollmixed-media-original